One of the main contents of the prepress system image quality control is the color (color) quality control, which directly affects the quality of the printed product. How the final output of the prepress system first depends on the quality of the prepress image scan. Therefore, the knowledge of the scanner and the correct configuration of the scan are crucial. This article mainly introduces scanner feature testing. Folding Bed,Folding Extra Bed,Folding Trundle Bed,Folding Bed With Mattress AU-PINY FURNITURE CO., LTD , https://www.au-piny.com
The goal of color management is to obtain the same or consistent color effect on different devices. To achieve this goal, all device-related colors need to be described in a device-independent manner. The test of scanner characteristics in this topic is based on the ICC standard specification. The generated characteristic file can be applied to any software that supports the insertion of the characteristic file. Using this file, under the drive of the color management engine, colors can be transferred to different devices and converted into colors suitable for the device to ensure the consistency of color reproduction on different devices, and can be displayed on the screen. The effect of the output device is approaching to achieve computer screen proofing. Scanner characterization is accomplished through the scanner profile.
The workflow for generating an ICC scan profile includes the following steps:
First, scan a standard IT8 test manuscript with the scanner to be calibrated; second, read the calibration scan data and the corresponding reference data into the Scanopen program; and thirdly, generate the calculation based on the calibration manuscript and the reference data. ICC input profile.
The following section describes how to scan a calibration draft by scanning software or Photoshop scanner plug-in and how to generate an ICC scanner profile through Scanopen software.
1. Generate a calibration scan
Use the scanner to be calibrated to scan a standard calibration draft. You can use any existing scanning software, but turn off all image processing features. Depending on the scanner used, calibration scans can be obtained using one or several different methods.
The following aspects must be kept in mind during the generation of the calibration draft:
It doesn't matter which scanner you use; choose the scan area as accurately as possible; don't use any color correction or matching; use normal sharpening filters; don't use any input profile; scan images stored as TIFF (RGB )file.
In order to scan the calibration scan, the scanner must be in the basic setup for normal scanning.
The operation of different scanners will be different, but the basic process is similar.
1) Start scanning software.
2) Place the standard scan original on the scanner glass of the flatbed scanner or on the roller of the roller scanner.
3) Perform a preview.
4) Select a rough scan area from the pre-scan chart.
5) Perform a rough sweep with basic density analysis.
6) Select the precise scan area from the rough scan.
7) Check the scanner settings.
Go to net: None; Output: 60 lines/cm; Magnification: About 40% for reflective originals, 60% for transmitted originals; Calibration: None or TIFF (RGB); Quality: Best; Contrast: Standard; Color Assistant: Off; LCH Correction: Not corrected; Filter: Standard. (Different scanners may be different, but the general principle is not to go to the network operation, do not perform any calibration operation).
8) Enter the scan file storage file name.
9) Select a folder to store the calibration scan file (smoothing) and select the TIFF (RGB) file format.
10) As a calibration scan, some scanning software can select the corresponding calibration scan menu command. At the same time, the calibration scan will be automatically saved as an image file.
If the scanning software does not support the scanner you are using, you can use the scanner's own scanning software or scan it with a Photoshop plug-in to generate a TIFF (RGB) calibration image file.
2. Generate an ICC Input Profile
There are two ways to generate an ICC input profile in the Scanopen program: The first method is to use the Scanopen wizard, which can be guided step by step under the guidance of the wizard; the second method is to use the expert mode.
The following is a method to generate an ICC input profile in the Scanopen wizard mode.
You can start the Scanopen wizard in the following ways:
1) When you start Scanopen, a new dialog box appears. Click the "Next" button at the top of the dialog window.
2) If you have worked in expert mode, you can click the icon on the toolbar to enter the wizard mode, and the expert mode is terminated.
Before starting to generate the property file, you must have the following two files: IT8 calibration scan image files in Tiff (RGB) format and files containing the corresponding reference data for the scans.
The process of creating a profile using the Scanopen Software Wizard is divided into the following steps.
1) Start up the Scanopen software. Scanopen automatically displays a new dialog box. The user information and program serial number need to be entered at the first start. Click the "Next" button in the "Begin with the Scanopen Wizard" area of ​​the dialog. This starts the Scanopen wizard (see Figure 1). 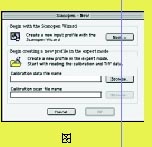
(to be continued)
February 24, 2024