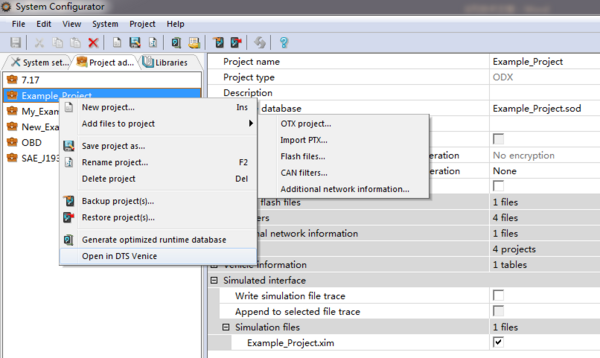
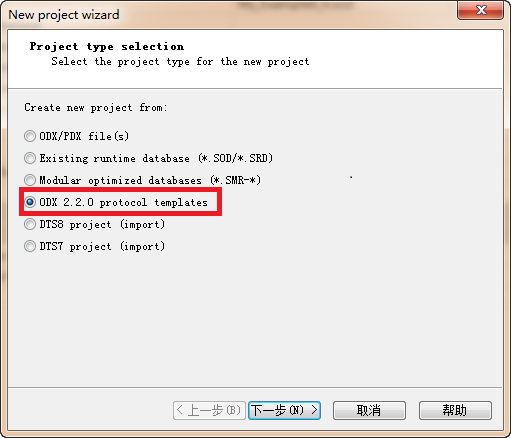
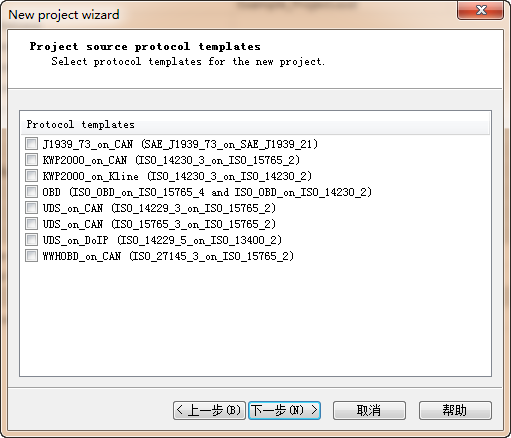
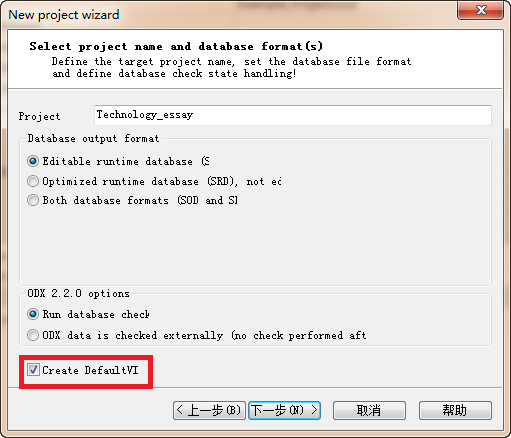
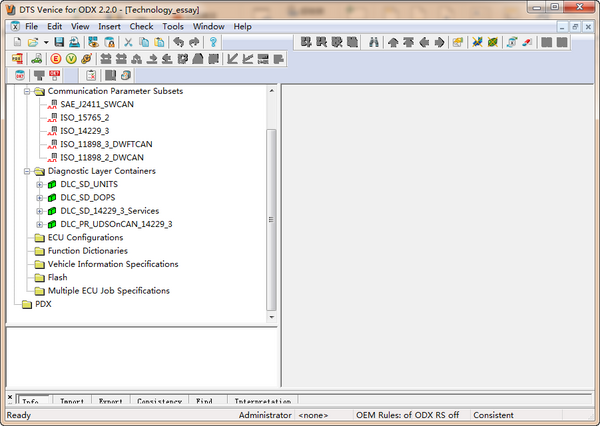
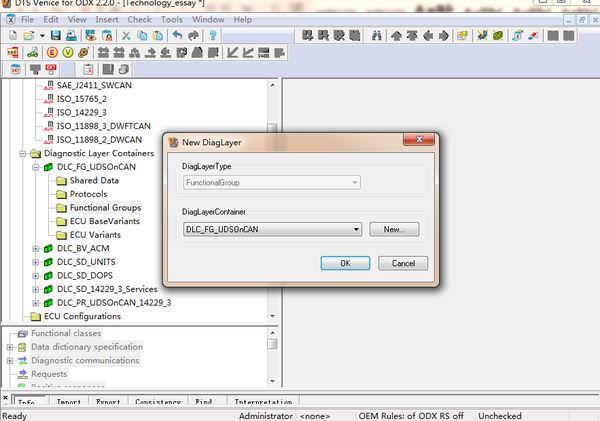
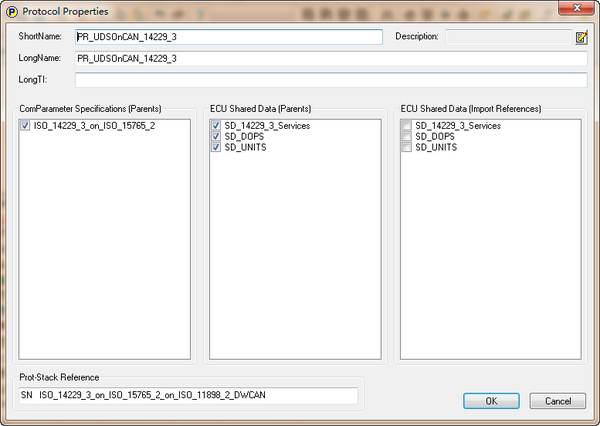
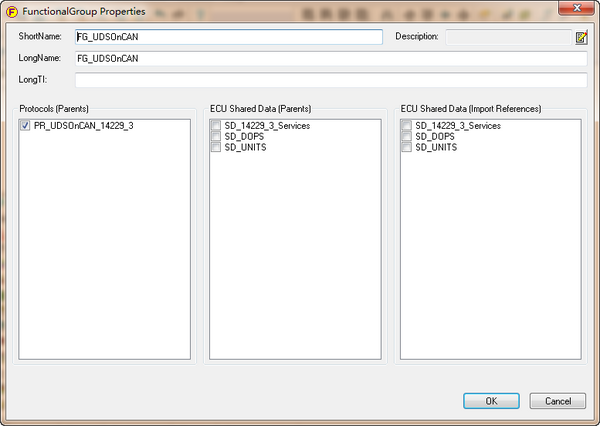
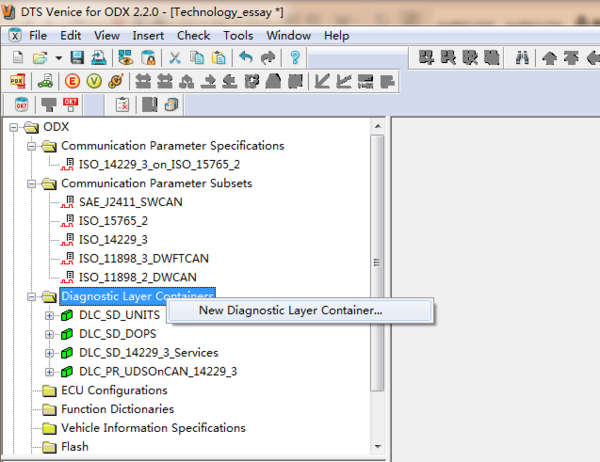
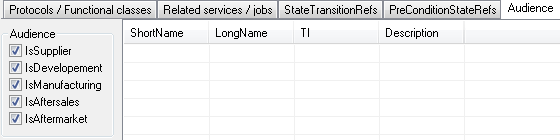
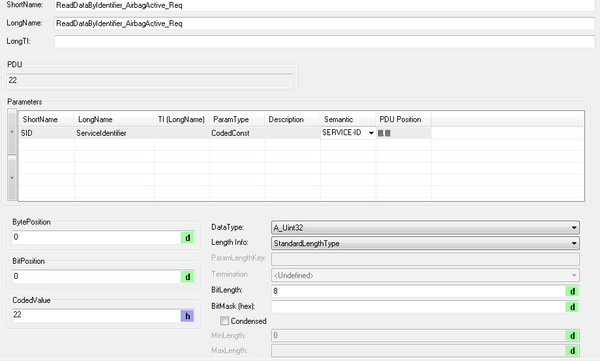
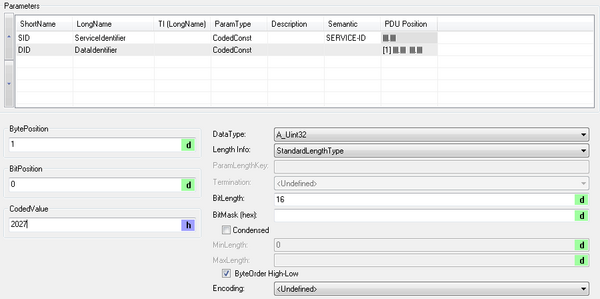
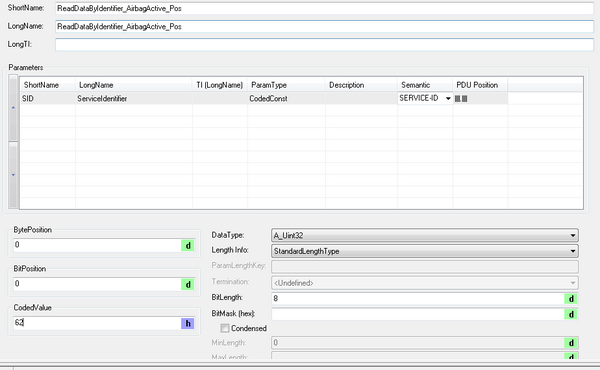
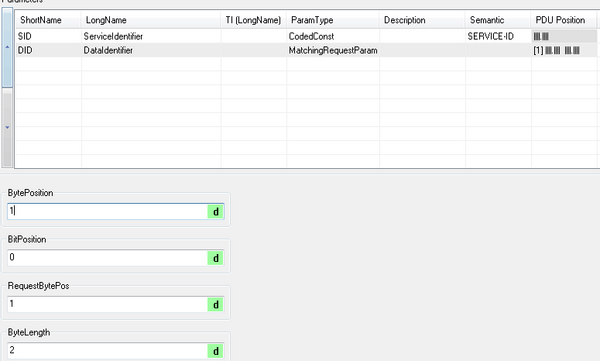
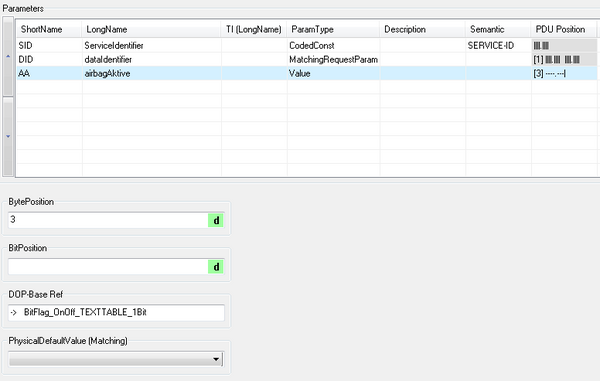
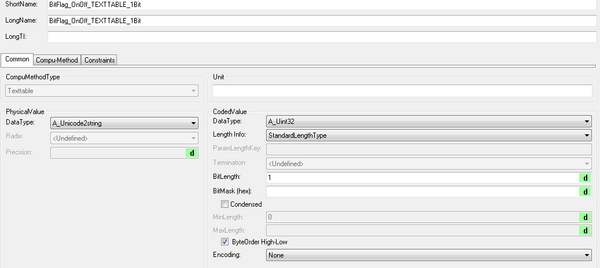
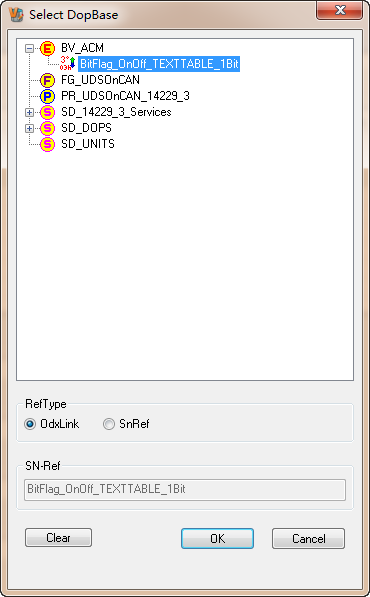
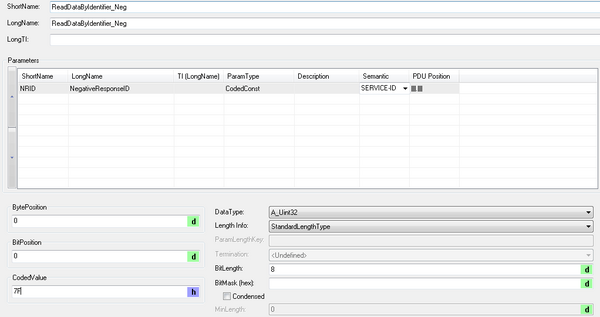
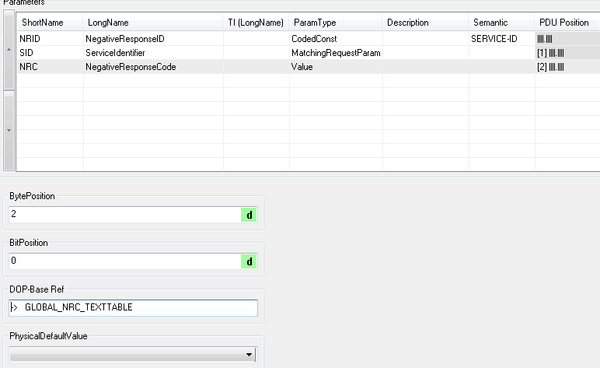
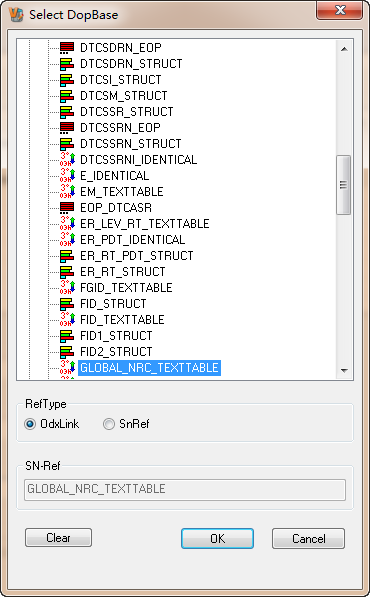
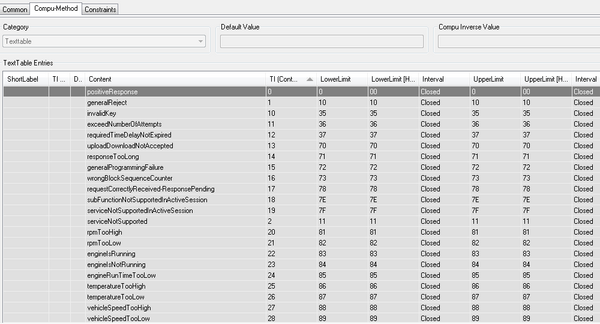
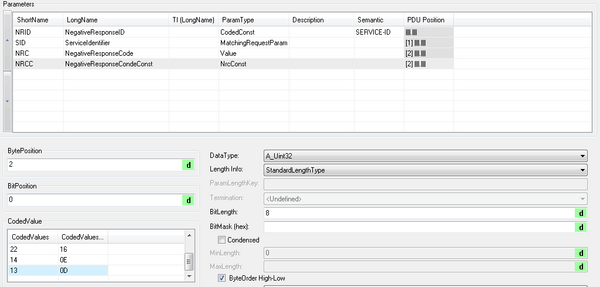
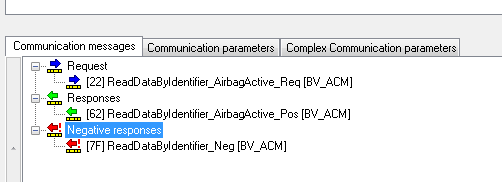
Because the DTS instruction manual only gives a brief process of creating ODX in English. In order to facilitate users to use Venice, we will give a more detailed introduction to how to create an ODX template in DTS Venice in graphic form. At the same time, we will create a 22 service as an example to explain how to establish a complete service. 1. Create a project A project is a project. This process is completed under the system configurator. The specific opening methods are as follows: Start → All Programs → Diagnostic Tool Set → System Configurator. Open the interface as follows: Here you must pay attention to the time limit of your license. If the time has passed, please contact our relevant personnel in time to obtain the latest license. Enter the project administration interface, where you will find several example projects that already exist after the software installation is complete. Right-click any project and select the Open in Venice option to open it in Venice for definition and modification. Right-click new project in the left frame to start creating the project. It should be specifically stated here that in general, we choose the ODX 2.2.0 version of the template because this is the latest template. You can also choose the version that suits you according to your actual needs. After opening the template, the following protocol options will appear: If you are using the CAN channel, choose (ISO_14229_3_on_15765_2), if you are in the DOIP format, choose the corresponding protocol content, you can choose one or more. The difference is that after opening Venice, the internal inclusion protocol is distinguished. Here we have chosen the most common CAN channel mode. As shown below: note: ①In the naming convention of DTS, there is no space form, you can use English underscore instead or capitalize the first letter. ②The reason for choosing Create Default VIT here is that when we cannot add detailed Vehicle Information to Venice and need to test in service in the test tool, this option will help you simulate the corresponding vehicle information. Select the next step, so that a basic project is created. Open in Venice, you can see the following interface: 2. Build the FG layer In Venice, in order to better define and distinguish the ECU, it sets up different levels of container layers to sequentially divide their corresponding functions. From top to bottom: SD (Share Data), PR (Protocol), FG (Functional Groups), BV (ECU Base Variants), EV (ECU Parameter ECU Variants) five container layers. The relationship between the five can be understood as a layer of inheritance, or it can exist alone. The inheritance relationship is to avoid data redundancy and later expansion. We can create a new DLC by right-clicking in Diagnostic Layer Containers. The naming convention is DLC_the container layer_name. Note: The FG layer is to be selected under the New Group under Functional Groups. What we should pay attention to here is to first establish the inheritance relationship between each layer. Double-click any layer to open its inheritance relationship window for selection and replacement. For example, the inheritance relationship of the PR layer is shown in the following figure: We see that it has actually established inheritance with the relevant content of the SD layer. All we have to do is connect his next FG layer with him. Note: The FG layer can also jump to inherit the content of the SD layer. 3. Build the BV layer Right-click in the Diagnostic Layer Containers to create a new DLC. The naming convention is DLC_the container layer_name. After the creation is complete, create new under the corresponding container layer, select the ShortName that has been defined, and create it. After opening, we will see the same inheritance options. Just select the FG layer above. 4. Create 22 services Here we take Airbag Active in ACM as an example. Specific steps are as follows: 4.1 Define service In Diagnostic Communication, select Diagnostic services and right-click on new data to define Short Name and Long Name. The definition of Name itself should be in accordance with the specification, which is convenient for later search and modification. The basic definition is as follows: In general, we need to define Diagnostic Class, Semantic, Addressing, Transmission Mode, and Protocol. The two points to note here are: ①We should pay attention to the Audience part as shown below In some cases, Audience may not include every option. Similar to 10 services, Audience only has the Development option checked. ②Some services require references to Positive Response Suppressable Bit Mask and Parameter Reference. For example 10 services. 4.2 Definition of Request To define the request part, analogous to service creation, just right-click on new data under requests to define Name, and its definition method is to add _Req later. The key point is the definition of the parameter part. The definition results are as follows: The focus here is on parameter type selection and semantic definition. Then according to the specification, define the byte number, data type, etc. of each Req. In particular, the encoding part should be noted here (this is what many beginners ignore), as shown below: Please refer to the Venice documentation for the specific meaning of each encoding. The following is the DID definition section: We will find that the Bit Length is 16 bits and the encoding is Undefined. The content of each Req will be different, please study carefully. 4.3 Definition of Positive Response In the same way, right-click on new data, and add _Pos in the Name section. The definition of its DID part is shown in the following figure: We found that its parameter type was changed to Matching Request Param, which is to match the request part, and the start bit and the number of bytes should be defined. Each service will cover its own communication parameters in the positive response. The parameter of this service is abbreviated as AA, Airbag Active. The definition result is as shown in the figure below, which involves the definition of DOP parameters. Among them, some of the content of DOP-Base Ref can be directly referenced in the upper container layer, and some of the unique needs of this layer need to be defined and referenced at this layer. The specific definitions are as follows: ①Select Data object properties in the Data dictionary specification and create new data. Type the parameter name (this name is defined according to the actual use attribute, it is recommended to name it according to the specification), and its definition result is as follows: Note: Data Type and method Type. ②Define Compu-Method, the definition result is as follows: Some DOPs also require limit settings for the constraints section. After completing the DOP setting, go back to the AA definition link and make a reference. 4.4 Definition of Negative Responses The difference from the above two settings is that in Negative, you first need to define the NRID (ie, Negative Response ID) definition as shown in the figure: Then define the SID, where the SID role is matching, and its definition interface is as follows: Note: Select the value of each Byte Length and Bit Position. The second is the definition of NRC (Negative Response Code). Here we refer to the DOP defined under the SD layer. The detailed settings are shown in the figure: The NRC here contains all the data that needs to be coded for the Negative Response. We can enter the DOP setting interface by right-clicking to to find a large amount of code definition data. You can also see the corresponding scale constraint in constants. Finally, the definition of NRCC (Negative Response Code Const), the setting interface is shown in the figure below Note: BytePosition is determined by the BitLength occupied by the above three parameters; each CodeValue has a corresponding meaning. For the specific correspondence, please study the ASAM14229 protocol. In this way, we have completed the setting of all relevant parts. Return to the Diagnostic Service interface. 4.5 Complete the reference and check Find the service you defined in Diagnostic Service, and add the corresponding request, positive response, and negative response in order by right-clicking on new data. Then select the check tool. Check for correctness, remember to save. In this way, we have completed the complete construction of Venice's next 22 services. Timer Controller For Fish Tank Light,Timer Controller For Aquarium Light,Aquarium Led Light Timer Controller,Fish Tank Light Timer Controller Shenzhen GAKO Aquatics Products Co., Ltd , https://www.gako-aquarium.com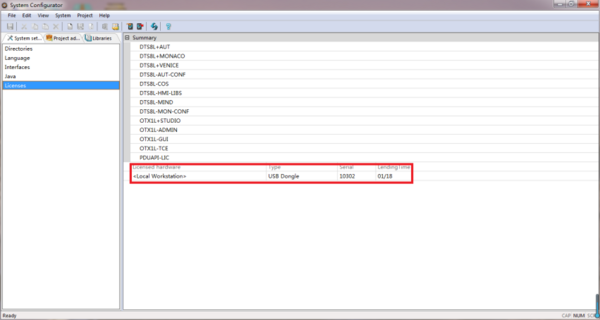


April 15, 2023